|
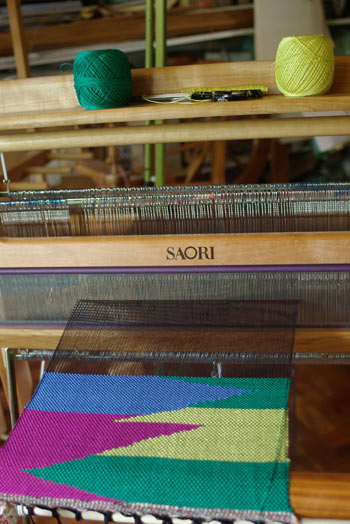
Here is what you can achieve with Clasped Weft. It’s an easy technique for making angled patterns and only requires two shafts. These visual instructions use two colours (green and blue).The green weft is wound onto a bobbin on a shuttle and the blue weft is drawn up from the floor underneath the loom.. I think this will look great as a table runner and helps me to weave a little every day. You can plan the design beforehand but it’s such an intuitive technique that feeling the colours and design as you go feels really good. Here’s a link to a video I created.
|
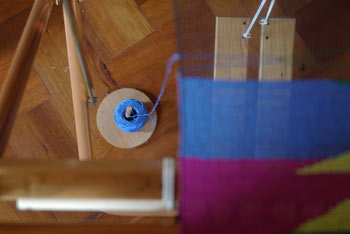 Here is the blue weft in a ball placed on one side of the weaving on the floor underneath the loom. |
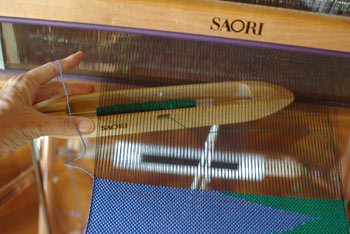 Open the shed and bring your shuttle across the open shed (green weft) and pick up the blue weft on the other side as shown. Next, return the shuttle across the same open shed. |
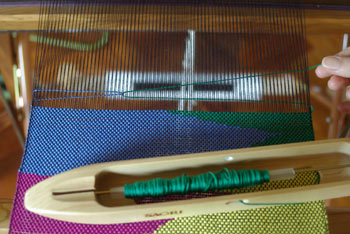 Here you can see me pulling lightly on the green weft and drawing across the blue weft which is now looped through the green weft. |
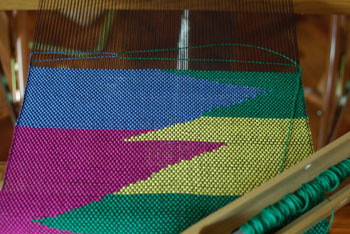 Keep pulling on the green weft until the position of the colour change is where you want it then beat the row into position. Change sheds and repeat the procedure. |
Clasped Weft Weaving for Great Designs
by
Comments
16 responses to “Clasped Weft Weaving for Great Designs”
-
I’d always wondered how that was done…your photos and instructions make it all so clear and simple that you’re inspiring me to give it a try. Thankyou!
(I’m a fellow Aussie weaver, although now in the UK)
-
Oh that looks like great fun and I would like to try that
-
Very interesting, Kaz. So you have two threads (of the same color) in each shed? I think that’s why I didn’t grasp the idea before. It looks striking and I think I’d like the idea of designing as I go along.
-
I’ve seen clasped wefts used in “regular” (i.e., non weft-faced) weaving as well. I think about trying it once in a while, but it does seem a bit much with fine threads…………
-
this gets me thinking……
thanks for the great instructions! -
Thanks for these instructions, they are very clear and make me want to try this technique!
-
Lovely project, really love the colors. Where did you acquire the Saori loom?
-
How interesting!! I must try it! Thank you for showing how to do it.
Kiwi -
Hello Kaz,
I like your demo (specially the demo on Youtube), I am now experimenting with wool but I use 4 threads in a centimeter. The result is to course. I thnik I have to use a finer thread. I wonder if you tried this technique with 3 colours in one line. Ik tried that but that makes it very complicated.
Greeting from Holland. -
Wow, thank you for this, I am eager to try this now!
-
Fantastic demonstration and a clear set of directions to such an impressive finish. A member of the Cricket Forum on Ravelry shared this site. You are providing a great resource and it is most appreciated. I especially thank you for sharing these steps to Clasped Weaving
-
I’m president of a weaving association in the dordogne,France.We organize every two months our Tiss’amical.A getting together of members of Faire et Fil to work on a certain theme and show our work.On sunday we worked on clasped weft as a lot of members hadn’t heard of this technique.It is very pleasant to do and rewarding in the results.Your photographs are excellent and the idea of the ‘blue’ thread on the floor to be easily unravelled .Very Good!
-
Hi I was just wonering if this could be done on 8 shafts? Or would it not work the same, I’m working on a double cloth at the moment with silk threaded on 1 and 5 and cotton on the rest; I’m guessing it would work on the top silk layer but im not so sure…Might give it a try tomorrow…
-
That is sooooo cool!
-
Very clear instructions and photos. Thank you!
-
Glad you posted these photos as well as your video. I could not see what was happening in the video… here with the photos it made sense what you were doing with that blue yarn.. duh its the other side of the green.. the are locked together! I am a new weaver with a ridged heddle loom so getting the most out of my weaving is really important!
Thanks!

Leave a Reply