
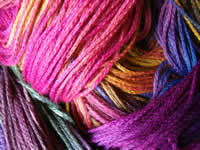
 This yarn is a 100% Bamboo Yarn from Christines Yarns. Originally I dyed this for the Clapotis as it was so difficult to find a good colourway yarn in Australia. Dyeing is actually very easy and I’d encourage any knitter or weaver to ‘have a go’. You’ll be thrilled with the results.
These instructions are for cellulose fibres such as cotton, bamboo, rayon, chenille etc. Dyeing can be done with cold water. Wool dyeing requires heat to fix the dye.
You will need:
Buckets
Plastic Measures (cup, teaspoon)
Stirrers
Plastic gloves
A sponge
Newspaper, a sheet of plastic to protect your working surface
Fibre Reactive Drimarene K dyes in powder form (I use a cool primary set of red, blue and yellow)
Additives
Salt (Sodium Chloride)
Soda Ash (sodium carbonate)
Note: Dyeing utensils cannot be used in the kitchen for food preparation. Use a face mask, protective clothing and gloves when working with dyes and dye powder. The dye will stain.
Step 1:
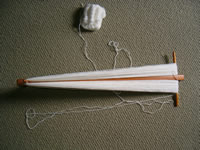 If your yarn is in a ball, wind it into a skein. I used a niddy-noddy here but around the back of a chair will also do. Tie several loose ties in a different coloured thread ( I use a woollen yarn) around the skeins.
Weigh the skeins. This is needed so that dye amounts and additives can be correctly added.
Wet down the skeins in a bucket of water.
Step 2:
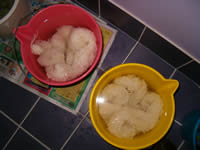 Soak the skeins in the additives using the following chart or adjust proportions as needed:
|
Fibre
|
Salt
|
Soda
Ash |
Water
|
| 50g | 5 teas | 2 teas | 1.5 litres |
| 100g | 1/4 cup | 4 teas | 3 litres |
Add Salt and Soda Ash to water and stir until dissolved. Place previously soaked yarn into water and leave to soak for 45 minutes, stirring frequently for the first 15 mins.
Step 3:
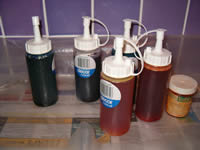 Prepare the dyes
Add one teaspoon of dye powder to a little hot water to disolve then add 100mls water. Here I have placed the dye solution into squirt bottles.
These types of bottles make it easier to control the application of dye although I have also just poured the dye solution onto the yarn.
This is the exciting part!
Step 4:
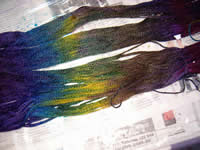
Protect your working surface with paper and a sheet of plastic.
Remove yarn from the additives and squeeze gently. Lay out on a sheet of ‘cling wrap’. (this is used to wrap up the yarn when dyeing is finished)
Squirt the dye across the yarn and blend the colours into each other with a sponge. I use a cheap kitchen sponge.(Make sure you have your gloves on!)
I also wash out the sponge as I blend the colours.
Step 5:
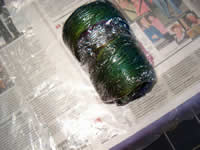 Wrap up the yarn in the ‘cling wrap’ securely and leave to cure for up to 48 hours.
After this leave for 15 minutes in hot soapy water then rinse until the water is clear.
Viola!
Leave a Reply