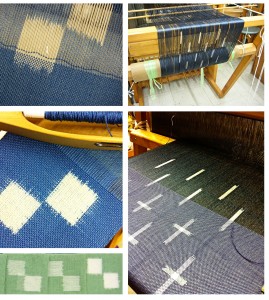
 Kasuri heaven, that’s what it is. The Kawashima Textile school was everything and more in providing the Kasuri experience I needed.
Although the origins of *Kasuri in Japan are debated and are sometimes said to be from Indonesia and South East Asia the time and skill committed to kasuri in Japan creating Kimono and other textiles over the centuries have surely made a firm claim to Kasuri as distinctively Japanese. It was this mystery of tying resist knots for an unformed textile that has always fascinated me. Creating textiles by knowing each thread before weaving and designing with dye allowing for undyed and overdyed elements.
Most ikat textiles produced in Indonesia such as geringsing are woven on the backstrap loom after resist tying on frames. Although I greatly admire the skills and strengths of the backstrap I generally use a floor loom to weave on and Japanese Kasuri offers this expertise. Without the frame how do you tie knots with precision on a warping board? How do you solve the problems of dragging a warp through heddles and reed and stopping too much blur in your design? It turns out that these questions are quite easy to answer and deal with after all. Kasuri heaven.
A few things struck me as significant. (note – this is only personal epiphany as I know many weavers who work in all sorts of viable ways that work)
Pre-sleying the warp is a normal thing to do! In my years of learning weave pre-sleying was hardly ever mentioned or seemed just too hard and odd. Seemed like double the work of just using a raddle. But it’s not. It makes the warp glide on and is quick to set up and organise even small bouts of Kasuri or wild warps. I have bent over the back of looms at the raddle fiddling for hours when I could have been sitting on the lounge in front of TV pre-sleying a warp in perfection. It doesn’t matter that you have to sley the warp to the correct dentage once you’ve beamed it – it’s still easier…at least for me. The Saori Threading box also leans on this tradition but you sley the warp for real and it doesn’t have to be done again.
Risk and commitment!
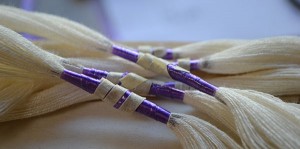
 In 2008 I uploaded a video on how to tie an ikat knot. This is a +great knot. Very easy, quick and secure. So I went to Kawashima assuming this would be the knot and I would be advanced in the class. 🙂 Well, not so. The knot I learnt there, although similar, was different. It also had a temporary knot and plastic underneath, then tape over the top of it. Seemed to be security overkill, but when you are faced with hundreds of knots over many months to weave a kimono fabric length it isn’t the place for taking any risks whatsoever. This is where the very high level of skill and commitment to a design comes in. Once the design is underway there is no turning back. You commit your whole to it.
Winding, dyeing, rewinding…the Kiwaku for Australian handweavers
One of the biggest challenges I have had over my lifetime of weaving is yarn availability in Australia. Hence the lovely Saori yarns. We produce the world’s finest wool in raw form but have to buy it back from other nations who continue to house skills in producing yarn. There are a few mills in Australia but they are very limited for weaving yarns.
Consequently I have always dyed my own. This involves lots of winding, dyeing, rewinding back into a form that can be reeled onto a warping board etc. Although I have developed many tricks to avoid this as much as possible , the fine yarn I use makes reeling dyed skeins back into a good yarn package difficult. Simple cone winders aren’t great and need a measure of luck to do it.
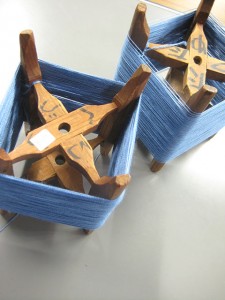
I’m hoping I’ve now found the answer in the Kiwaku and winder. The kiwaku is the Japanese form of a yarn cone. I always thought they were ancient and exotic yarn holders but they are very much alive and well used in producing woven textiles today. The kiwaku winder is efficient and reels the yarn into a very usable ‘cone’ for reeling into a warp after dyeing. I really think that kiwakus could be widely adopted by handweavers in Australia. We need to dye yarn, we need to cone all weights of yarn easily. We need a reliable way of doing this.
Cutting the end warp loop – yikes!
After winding a warp on a frame or mill I used to use the end loop to place on the apron rod at the back beam. After all the loop should maintain the tension and you would think that this would be a given for Kasuri weaving on a floor loom. But it’s not. Cutting the loop is the way Saori warping is done and also weaving at Kawashima. Cut then tie to the back of the loom. Mind you this is the only CUT that is permitted. Don’t cut warps that have done wrong out of your Kasuri design as a shortcut as I did. It will make the designated weft kasuri, that you have spent all day dyeing, wrong. Oh well, just go back and fix it all. It’s worth it.
*Kasuri as a Japanese word comes from the verb kasureru which means ‘to blur’. Kasuri is ikat and ikat is the Malay-Indonesian term which is most commonly used in Australia to describe the process and fabric produced from tying threads for resist dyeing before weaving into cloth. Japanese Ikat Weaving by Jun and Noriko Tomita
+Knot from Japanese Ikat Weaving by Jun and Noriko Tomita


Leave a Reply