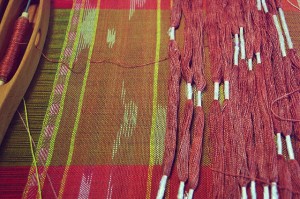
 After returning from Kawashima textile school I had to put what I had learnt into practice. Ways of working in my own studio needed to be integrated and combined into my newly learnt ways and I think it will take me a few pieces to fully implement this. My loom and tools are different and I wanted to use my new skills rather than falling back on my established ikat practice to see where it took me. I chose a simple weft kasuri on a painted warp. Seven different block patterns were dyed for the weft resist. I also wanted a bit of ‘mystery’ and added some hand picked twill blocks to overlay the kasuri resisted block patterning. Personally I find weft kasuri more challenging than warp kasuri but I know not everyone feels this.
In Kawashima all the (invisible) really hard work was done for us, i.e. calculations, so our work would proceed as successfully as possible…and it did. But it really is the calcs and measurements based on expected shrinkage with the yarn and how I actually weave that is the important foundation and basis for a good kasuri cloth.
 I’ve woven two Kasuri pieces so far and you can see the beautiful kasuri wefts in their resisted blocks in this photo. The first piece reflects the intended design with a series of blocks and their reverse pattern. The second is using a shifting in the weft to produce more fluid and unexpected designs. Both textiles are on the same warp but have different coloured effects because of the warp painting process. Even the resist areas have different hues based on the warp colouring and don’t remain white.
I am happy with both of the pieces and love the technique. Next is using the warp shifting box to change the warp for kasuri/ikat. This is something I’ve always done with a tying of the warp threads at the back of the loom before beaming. I think the warp shifting box will be more flexible and capable of changing the warp kasuri within the same warp.

Leave a Reply